Tuesday, 28 April 2015

Week 6 - Infographic Design

My knowledge of an infographic (information graphic) is a representation of information in a graphic format designed to make the data easily understandable at a glance. People use infographics to quickly communicate a message, to simplify the presentation of large amounts of data, to see data patterns and relationships, and to monitor changes in variables over time. 
Infographics are found in most public environments, for example, traffic signs, subway maps, tag clouds, musical scores and weather charts.

After completing the task and creating an infographic myself, I can see how that this tool would be excellent when teaching in a classroom. This will get the students attention as it has less writing and more pictures to look at and explain.

This is my infographic that I have created:


websitewer
easel.ly

Week 6 - What is Binary

This week I have designed a binary game for children aged between 6 years and older.
Binary is a number system that has two unique digits. For most purposes, the decimal number system is used and has ten unique digits, 0 through to 9. All other numbers are then formed by combining these ten digits. All computers are based on the binary numbering system. Addition, subtraction, multiplication and division are all possible in the binary system. 
We use the decimal system in everyday life because it seems more natural as we have ten fingers and ten toes. The same with the computer, as the binary system is electrical nature as it is charged versus uncharged. 

Week 6 - Teaching Students how to use Binary Codes

Lesson Plan for Classroom:

  1. Explain the motivation for the lesson, and tell the students that we're now going to play some games which will give us practice in writing binary numbers.
  2. Divide students into small groups (optional - this lesson can be done by individuals, pairs or small groups.).
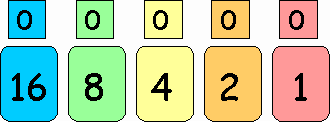
  3. Distribute flash cards, one set to each student or group. The first time you do this lesson you'll have to have the students make their cards. The set should look something like this example: (The large cards are approximately 3in x 4in, and the small squares are 2.5in x 2.5in. Note that the small cards have a zero on one side and a one on the other.)


  4. Have students sort the cards in descending order so that the largest is on the left and the smallest is on the right.
  5. Discussion: "What do you notice about the numbers on the cards?" For the younger kids it is enough for them to notice that 1+1=2, 2+2=4, etc. Middle kids should recognize 1 x 2 = 2, 2 x 2 = 4, etc. High school kids should say something like "powers of 2." They should also note that these are the place values discovered in the preliminary discussion.
  6. More discussion (optional):
  7. a. "If I had given you another card, what would it have been?" (32)
    b. "How many cards would I have given you if the maximum card were 128?" (8)
  8. More optional discussion: Another fun thing to point out is that each card is one more than the sum of all the cards lower than it. For example: 1 + 2 = 3 = 4 - 1, and 1 + 2 + 4 = 7 = 8 - 1. "Without taking the time to add up all the cards, can anyone tell me the sum of all the cards?"
  9. Game #1: Have the students turn over the cards so the numbers are hidden. To reinforce their memory of the different place values call out numbers for them to "find." When they seem to know where all the numbers are, with a playful grin call out a number which they don't have. For example, 3. Some students might point out that they don't have 3, but they do have 1 and 2. Do a couple other sums which involve 2 cards, then move to 3 cards, etc.
  10. Now flip the cards back over so that the number is showing.
  11. Game #2: Call out a number, and have the students place 1s above the cards which sum to that number, and 0s above all other cards. For example, if you say 11, students place 1s above cards 8, 2, and 1, and 0s above 16 and 4. An easy one: 5 (answer 4, 1); harder: 22 (answer 16, 4, 2); last one: 15 (answer 8,4,2,1). If some students find the answers quickly, challenge them to find another solution (they won't be able to do so). Have older kids turn over the flash cards after the first example so they get to practice remembering the values.
  12. Ask if anyone in the class has a system for finding an answer. Upper grades should have done so. Request that a student demonstrate the system to the group quickly. (A good method for doing this is to subtract the largest power of two you can from the original number, then subtract the largest power of two you can from that number, then subtract the largest power of 2 you can from that number, etc. until you get down to zero. For example, 37 - 32 = 5, 5 - 4 = 1, and 1 - 1 = 0. Then, write 1s in the places of the powers of two you subtracted and 0s elsewhere: 37 = 100101.)
  13. Discussion
  14. a. "What's the largest number you can get?" (31)
    b. "What's the smallest number you can get?" (0)
    c. "Can you do your age?" (Sure, unless you're older than 31!)
    d. "Can you suggest an impossible number which is between the smallest and largest numbers?"
  15. Explain that since we know the system we're using is binary, the 0s and 1s represent the original number. Older kids should see the binary expansion as a sum of products where the decimal value is equal to the sum of each binary digit multiplied by its corresponding power of 2.
  16. Spend a few minutes reemphasizing the connection between binary numbers to decimal numbers. For example, the decimal value 453 is equal to four 100s plus five 10s plus three 1s. Similarly, the binary value 111000101 is equal to one 256 plus one 128 plus one 64 plus one 4 plus one 1. You may want to point out that just as the place values in the decimal representation are powers of 10, the place values in the binary representation are powers of 2.
  17. Game #3: What number is (binary) 11001? 1011? Try to have the advanced students visualize the cards.
  18. Can we do all numbers up to the maximum discussed above? To answer this question we need 4 volunteers, each of which holds a large 0/1 card. (We won't go all the way to 31. That would take too long. Instead we'll go to 15.) Each of these 4 students represents one of the flash cards used in the earlier exercises. Have the remaining students direct the 4 students to show 0s or 1s, and sit or stand accordingly. Start with 0, all 4 students should show 0s, and be seated. Next do 1, students should show 0001, and the rightmost person should stand up. Then 2 should be 0010, etc. Try to elicit a system for incrementing the numbers. Point out that this system is like adding 1 each time. Younger kids may not see a system.
  19. Discussion: Can all numbers be represented using only 0s and 1s if I gave you enough cards? What's a simple proof of this? (Answer: we can always add 1, so we can start at zero and get up to any number.)

Friday, 17 April 2015

Week 5 - Final Reflection

Well what haven't I learnt in the last five weeks of this course?
My favourite part of participating in this design process, has been developing a wiki page with a group of peers from around Queensland and writing reflections in my personal blog spot. I have learnt how to use online concept mapping, screen shooting and embedding, which I have found that this would be a great way in educating students about technology within the classroom.

Throughout this challenge I was given numerous templates to assist when completing set tasks. This is also a big help and it will also help assist students with certain tasks that they are given. This subject has also helped me with the different use if technology and what it can do. Through these first five weeks it has helped me understand how important it can be in educating students. Technology helps students feel more independent and unique unlike other subjects.

Week 5 - Reading Reflection: Online Peer Assessment

Peer Grading verse Peer Feedback

Peer grading helps increase student performance on written exams and decrease failure rates in courses. Where peer feedback, together with the required revision, is a process-approach of writing within the classroom and is still yet undetermined if it improves a students writing.

Effects of Peer Feedback on Assessors and Students

This is beneficial to both the assessor and student, as the teacher can evaluate the work of a student, which will show them what the student knows and what improvement is needed. It is beneficial to the student as they can see what needs more attention and where their strong points are. 

My Pedagogy

I believe that both peer grading and peer feedback should be given, however in saying that, peer grading should be given by the teacher and only to the parent and student in private to minimise the bulling in the classroom. When a student receives good feedback it helps with their future studies and students will gain more confidence in their work.

References

http://www.sciencedirect.com/science/article/pii/S1060374399801179

http://www.lifescied.org/content/9/4/482.short

Week 5 - Reflection: Multimodal and co-constructed learning

Benefits that came from a co-constructed learning environment are:

  • Students are more engaged and motivated due to the learning task that are set for them.
  • Students become more independent, self-regulated and more autonomous learners as they took charge of their own learning.
  • Students interests and learning needs were identified and incorporated into the teaching curriculum.
There is even benefits for teachers, which include:

  • More time during class to work with students and observe the learning that has taken place.
  • Students motivation has translated to productivity.
With all these changes, teachers will be able to transform their classrooms with the help of ICT which will help develop a co-constructed pedagogy more quicker and easier.

These days children are using multimodal sources from an early age, which help enhances the students learning capabilities and engagement and motivation in each subject.

Thursday, 16 April 2015

Figure 1
This image shows that curriculum contains spatial and temporal dimensions. However, it is important for children to understand the interrelationships between the past, present and future.

My next diagram shows how future thinking promotes the knowledge, skills and understanding in students in order for them to think more critically and creatively about whats in the future and what it holds for us.
 
These five points that Wendy Fasso (University Teacher) has mentioned, I also believe that they are very important with all lessons for students for all ages.

References

http://www.teaching4abetterworld.co.uk/futures.html

Week 4 - Peer Evaluation Process

I found this week, my group was very understanding when it came to peer feedback, due to my busy lifestyle of full-time work, full-time university studies, running of my own business and mother to three children under the age of 7. When I did evaluate other peers work, I found the template great to use. I also found when evaluating peers that their work was well set-up and found how I could improve my own work.

Week 4 - Process Reflection on my Winning Design

Winning Design is Baked Chicken Spring Rolls

I have now finished my design process for my winning design, Baked Chicken Spring Rolls. After completion I posted my design process on my wiki page for the other students in my group to provide feedback on my design.

After making the product myself, I realised that once all ingredients were cooked and prepared (by an adult) the children were then able to place all ingredients into the spring rolls and were able to then wrap the spring rolls ready for baking. This meal is very nutritious, healthy and a meal that children would love to eat even with the hidden vegetables.


Friday, 3 April 2015

Week 4 - Reflection on Web 2.0 and Classrooms

The Web 2.0 provides opportunities for students to be creative, have a degree of control over their own learning, to be able to solve problems, to help improve their personal IT capability and to work cooperatively.

The 'Es' of Web 2.0 has 3 factors that were termed 'Es' of Web 2.0. They are as follows:

  1. Enjoyable and Exciting - students are able to show off their work through Web 2.0, which shares with a wide audience.
  2. Energises Learning - by working in groups students can exchange ideas, challenge each other and learn from each other.
  3. Emancipatory- this provides students with the opportunities to take responsibility for their own learning. 

Web 2.0 in Education

The impact of learning also takes place beyond the classroom. This now means that we can learn technology and communicate whenever and wherever. While digital technologies have merged the boundaries of work and play.

References:

Younie, S., Leask, M., & Burden, K. (2015). Teaching and Learning with ICT in the Primary School (2nd ed.) Abingdon, Oxon & New York, NY: Routledge.

Week 3 - Reflection on How Children Learn Technology Today

In today's generation, children are all over technology use, for example, video games, IPads and IPhones. My 2 year old has managed to unlock my IPhone and navigate herself around the phone to get to the games that she wishes to play. I have listed a few examples below of what encourages technology:

  • Video games encourage children to solve problems.
  • Story lines in children's TV shows encourage children to follow more than 1 narrative at a time.
  • Electronic media has shown that children are more social, confident and comfortable when it comes to solving problems than non-gamers.
  • Technology educates children the best ways that are suited to their personal learning styles.

Learning with Technology


I have done some research and found 8 ways in making sure that each child's experience with technology are educational and fun. The include the following:
  • Focus on Active Engagement
  • Allow for Repetition
  • Make it Tactile
  • Practise Problem Solving
  • Encourage Creation
  • Show Him/Her How to Use it
  • Ask Why
  • Focus on Play 


References:
http://www.lvhn.org/wellness_resources/wellness_articles/technology_and_your_health/how_technology_can_help_children_learn

http://www.education.com/magazine/article/11-ways-kids-learn-with-technology/


Week 3 - Reflections on Design Process

Teaching Science in Primary Classrooms

There are 3 core principles for the science that takes place in the primary classroom, they are:

  1. It is real science: this method is new, creative and original to the students and has real value (NACCCE, 1999) it is also science that help build the students natural curiosity, inventiveness and wonder (Rose, 2008: 8).
  2. It is rooted in investigative work: the best science that is presented in the primary classroom is hands-on and investigative work. Schools should ensure that the students are engaged in the scientific enquiry, including practical work (Ofsted, 2011: 8), as students need time to purse their own ideas in science (Harlen and Qualter, 2009: 48).
  3. It develops models and criticality: students must be given the opportunity to challenge their existing ideas (SCORE, 2013: 7)

Design Challenge using Coggle

Coggle is a great idea to explain to the students of what is going to happen in the challenge that is set. It also breaks down each area to show what goes with what do get the end result. The students can use this tool to express their feelings, emotions and create their own challenges that are set in the classroom. 

The main design goal of coggle is to be really simple, in which it is once you have the hang of things, and it being the effective means of communicating information in the 21st century.
At start this meant that coggle was very restrictive about what could go into it, but as soon worked out that breaking everything down into short-single lines was the right way to go.